Setting up your practice on the RIBA Fee Calculator
This is a guide to help RIBA Chartered Practices set up their account on the new RIBA Fee Calculator - an online tool to help architects calculate and generate a resource-based fee calculation for their clients and projects. You might find it useful to bookmark this page, or keep it open when using the Fee Calculator, for reference.
Accessing the Fee Calculator
There are two ways to access the Fee Calculator.
1. If you know the following financial information for your practice:
- Company overheads
- Staff costs
- Billable status of staff
then you will need to get your practice partner/director to grant you access using My Account on architecture.com.
To do this, ask your practice partner/director to:
- Log in to My Account
- Click My Practice in the left hand navigation
- Select the person who requires access
- Under Permissions, tick Fee Calculator Admin
Once they have completed the above steps, you will receive an automated email with instructions on how to access the Fee Calculator.
OR
2. If you don't know this financial information:
Your practice partner/director will need to set up the account. Send them these instructions, and ask them to complete the setup process, which includes inviting and adding other staff members.
Logging in securely to get started
- Log in using your personal RIBA login details. You’ll be prompted to follow our authentication steps, which involves adding your phone number and registering it by receiving an automated text message.
- This additional layer of security helps protect your identity online and keeps the financial data in the Fee Calculator safe. You'll recognise the process if you use online banking or verify your personal details for other secure internet accounts.
- Once you’ve registered your phone number, you’ll receive one more validation code to gain access to the tool and won’t have to do this step again for 60 days.
You will need to read and accept the terms and conditions to proceed.
Step 1: Check practice details

If these details are incorrect, contact support@riba.org or call 020 7307 5355.
Step 2: Add company overheads
Adding your annual company overheads accurately is essential to creating accurate fee calculations. You can visit the ‘Settings’ section of the tool at any time to change or update your overheads.
Company overheads can either be added as one total figure at the bottom of the page or entered as individual costs, line-by-line. These fields match those you complete in the RIBA Benchmarking Survey, so you may already have them.
You may find it useful to find this information in advance of setting up your Fee Calculator account.

The fields are:
- Rent and service charge
- Utilities
- Architectural and design software and IT
- Office IT and telecommunications
- Marketing
- Company car and fuel allowance
- Additional travel costs
- Accountancy and auditing
- Banking
- Professional Indemnity Insurance
- Other insurance costs
- Legal costs
- Depreciation
- Bad debts
- Pension costs
- Employer National Insurance contribution
- Other annual costs
Do not enter project specific costs at this stage, including any subconsultants that you have engaged on projects. These costs will be catered for at a project level.
Step 3: Add staff salary details

You will need to add any missing information, including salary details for those people whose information is automatically populated (marked as ‘incomplete’), as well as adding any staff who are not automatically listed. You must include salary details for all staff on your company’s payroll.
To edit staff details who are automatically added, click the blue pencil icon.
To add staff who aren’t listed, click the ‘Add a new staff member’ button.
If staff join or leave the practice, you can edit accordingly by visiting Settings.
Access rights
The following screen allows you to allocate the level of access for each individual team member. The options are Admin, Staff and None.
Admin: can see and edit all staff salary details and overhead costs as well as being able to generate fee calculations.
Staff: can generate fee calculations but do not have access to staff salary or company overhead information.
None: will not have access to the tool.

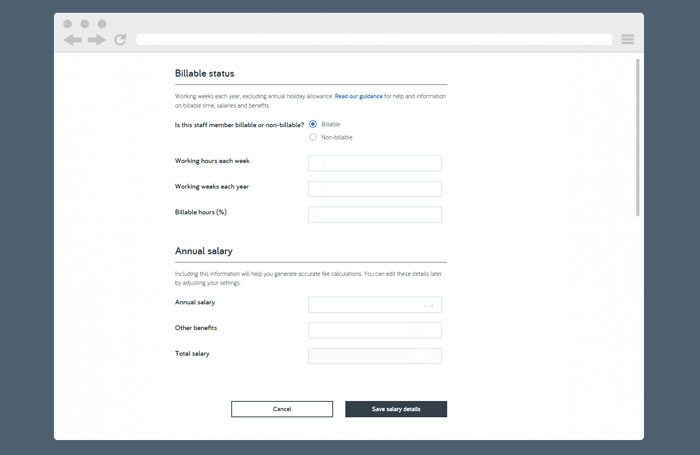
Billable status
You have the option for allocating staff members as billable or non-billable. All types should be added.
Non-billable staff include roles such as receptionist or practice manager – people whose time is not charged to projects
For billable staff you will need to know:
- How many hours they work each week
- How many weeks they work each year (excluding public holidays, holidays and other non-project specific work)
- The percentage of their time that is spent on billable work.
Cost rates and charge out rates are different. In short:
A cost rate is a rate for an individual which covers all the costs of the business with no profit. A charge out rate adds profit to this. The tool does not calculate an individual’s charge out rate - this is because profit is applied at a project level and not at an individual’s level, giving you the flexibility of charging different profit margins based on the specific characteristics and requirements of the project.

Finishing
Once you are happy you entered the information correctly, you are ready to create a fee calculation. You may find the How to generate a fee calculation guide useful.


